 Travis Horn
Form Validation with Vue.js

Client-side validation using JavaScript enhances user experience by giving feedback immediately to the user rather than having them complete a round-trip through the server.
Before we begin, you must understand that this type of data input validation is no substitute for server-side validation. Without server-side validation, you are trusting the user and whatever tools they are using to make sure input is valid. Client-side validation with Vue.js (or any other JavaScript library/framework) should be used in addition to, not instead of it.
I’ll also mention that many modern browsers have client-side validation built-in
by using HTML attributes such as (but not limited to) required and
maxlength="10". For example, with this tiny form:
<form>
  <input required />
  <button>Submit</button>
</form>
If you leave the input element empty and click Submit, Chrome prevents
form submission and warns you:
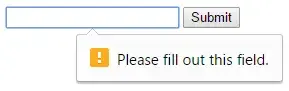
However, not all browsers support this and all of them behave differently. Let’s look at how to build our own form validation using Vue.js so it behaves the same in all modern browsers.
Scenario
We want to build a form with two inputs:
-
Name
-
Number between 1 and 10
Both inputs are required. The number input should only allow numbers between 1 and 10.
Setup
Start with a basic HTML file with the Bootstrap 4 stylesheet and Vue.js.
<!DOCTYPE html>
<html lang="en">
  <head>
    <meta charset="utf-8" />
    <meta
      name="viewport"
      content="width=device-width, initial-scale=1, shrink-to-fit=no"
    />

    <link
      rel="stylesheet"
      href="https://maxcdn.bootstrapcdn.com/bootstrap/4.0.0-beta.2/css/bootstrap.min.css"
      integrity="sha384-PsH8R72JQ3SOdhVi3uxftmaW6Vc51MKb0q5P2rRUpPvrszuE4W1povHYgTpBfshb"
      crossorigin="anonymous"
    />
  </head>
  <body>
    <!-- Content goes here -->

    <script src="https://unpkg.com/vue@2.5.3"></script>
    <script src="main.js"></script>
    <!-- We'll code this in a later step -->
  </body>
</html>
Our form will go in the content area. Just to get a prettier layout, we’ll put it inside a single col, inside a single row, inside a single container. Each of these elements have classes that position them nicely.
<div class="container mt-3 mt-sm-5">
  <div class="row justify-content-center">
    <div class="col-md-6">
      <form id="form" method="post">
        <!-- form elements go here -->
      </form>
    </div>
    <!-- /col -->
  </div>
  <!-- /row -->
</div>
<!-- /container -->
Now, our two input elements and submit button will go inside the form.
<div class="form-group">
  <label class="form-control-label" for="name">Name</label>
  <input id="name" name="name" class="form-control" type="text" />
</div>
<!-- /form-group -->

<div class="form-group">
  <label class="form-control-label" for="number"
    >Enter a number between 1 and 10</label
  >
  <input id="number" name="number" class="form-control" type="text" />
</div>
<!-- /form-group -->

<button class="btn btn-primary">Submit</button>
You could normally use type="number" for the second input, but I’m leaving it
as text to demonstrate validation.
Bootstrap provides validation
classes. Let’s
add invalid-feedback divs underneath each input.
<div class="form-group">
  <label class="form-control-label" for="name">Name</label>
  <input id="name" name="name" class="form-control" type="text" />
  **
  <div class="invalid-feedback">This field is required.</div>
  **
</div>
<!-- /form-group -->

<div class="form-group">
  <label class="form-control-label" for="number"
    >Enter a number between 1 and 10</label
  >
  <input id="number" name="number" class="form-control" type="text" />
  <div class="invalid-feedback">
    Make sure this is a number between 1 and 10.
  </div>
</div>
<!-- /form-group -->
Note that you won’t actually see these elements right away. Bootstrap hides them by default.
Building the Vue App
With the HTML in place, now we’ll jump into main.js and start coding the logic
for our form.
var form = new Vue({
  el: "#form",
  data: {
    name: "",
    number: "",
    attemptSubmit: false,
  },
  computed: {
    missingName: function () {},
    wrongNumber: function () {},
  },
  methods: {
    isNumeric: function () {},
    validateForm: function () {},
  },
});
In our data object, there are three variables:
-
name— Will hold the value of thenameinput -
number— Will hold the value of thenumberinput -
attemptSubmit— A boolean that indicates whether the user has attempted to submit the form. We can use this to hide validation warnings until after the user has tried to submit the form.
There are also a couple computed variables here:
-
missingName— Will returntrueif name is empty -
wrongNumber— Will returntrueif number is not between 1 and 10
Finally, there are a couple methods:
-
isNumeric— A utility function that checks to see if an input is a number -
validateForm— The main function that will be called when trying to submit
I mentioned above that there are two variables that hold the value of the inputs. We can wire those up with Vue models. Back in the HTML…
<input
  id="name"
  name="name"
  class="form-control form-control-warning"
  type="text"
  **v-model="name"
  **
/>

...

<input
  id="number"
  name="number"
  class="form-control form-control-warning"
  type="text"
  v-model="number"
/>
With our models wired up, we can use the computed variables to determine the
status of each input. missingNameis easy. Return true if value is empty:
missingName: function () { return this.name === ''; },wrongNumber is a little more complex, but not bad at all. Return true if
the value is not a number or it’s less than 1 or it’s greater than 10.
wrongNumber: function () {
  return (
    this.isNumeric(this.number) === false ||
    this.number < 1 ||
    this.number > 10
  )
},
Oops, we’re calling isNumeric() but we haven’t coded it, yet. I found a great
solution on Stack
Overflow.
Here’s what it looks like:
isNumeric: function (n) {
  return !isNaN(parseFloat(n)) && isFinite(n);
},
We’re actually done with the JavaScript except for the actual validateForm()
function. For that one, we just want to tell our app the user attempted to
submit the form and prevent it from submitting if missingName or wrongNumber
are true. Keep in mind you can keep adding computed variables here if you have
more inputs that need to be validated.
validateForm: function (event) {
  this.attemptSubmit = true;
  if (this.missingName || this.wrongNumber) event.preventDefault();
},
Done with JavaScript. Back in the HTML, we need to fire the validateForm()
function when the form is submitted.
<form id="form" method="post" **v-on:submit="validateForm" **></form>Now the form will not submit if there are validation errors. But, at this point, the user doesn’t know exactly why the form didn’t submit.
Remember those invalid-feedback divs that are hidden by default? We can make
them appear by setting an is-invalid class on the input adjacent to them.
Set conditional classes using Vue like so:
<input
  id="name"
  ..snip..
  **v-bind:class="{ 'is-invalid': attemptSubmit && missingName }"
  **
/>

<input
  id="number"
  ..snip..
  v-bind:class="{ 'is-invalid': attemptSubmit && wrongNumber }"
/>
The is-invalid class will only be applied when both attemptSubmit is true
and when missingName (or wrongNumber) is true.
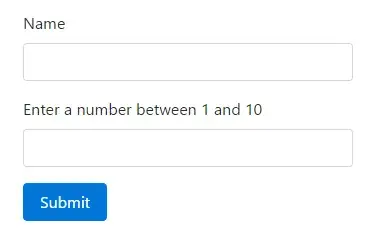
That’s it! On load, the form looks like…
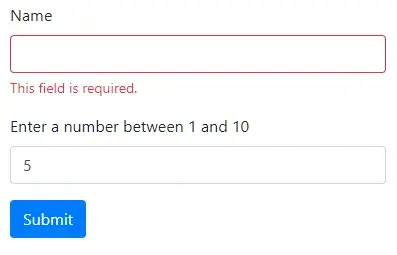
If you try to submit with an empty name, a warning appears.
Or similar if you try to submit a number outside the range.
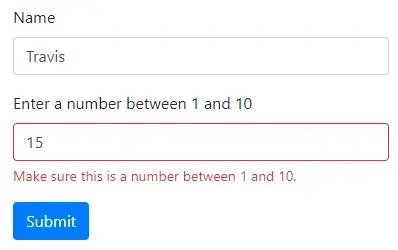
The nice part is that, the way we’ve coded it, when the user corrects their
mistake, the warning goes away immediately. You could remove the checks for
attemptSubmit if you want to display the warnings on load (and have them go
away immediately when corrected), but I think it’s bad UX to show warnings and
errors before the user has even started typing.
Cover photo by Chris Barbalis.