 Travis Horn
Vue Online Store with Shopping Cart

Today we’ll be building the basic framework for an online store and shopping cart with Vue.js single file components.
Setup
Before you begin, you will need Node.js installed.
Node.js comes packaged with npm, which we’ll use to
install packages. The first package we’ll install is vue-cli. We want to
install it globally. In the terminal/command prompt:
npm i -g vue-clivue-cli is
A simple CLI for scaffolding Vue.js projects.
It will let us skip the tedious setup of Webpack, configuration, source maps, hot-reload, minification, and directory structure for developing apps with singe file Vue components.
Once vue-cli is installed globally, you will have access to the vue command.
Use it to scaffold a
webpack-simple project.
vue init webpack-simple my-online-store
Project name (my-online-store) [enter]
Project description (A Vue.js project) An online store and shopping cart [enter]
Author Travis Horn [enter]
Use sass (y/N) n [enter]
Now change directory into the newly created directory, install all dependencies, and start the development server.
cd my-online-store
npm i
npm run dev
After a moment, your browser should automatically open to http://localhost:8080/ and display a simple pre-made Vue app.

For ease of design, let’s pull in Bootstrap
4. Download
Bootstrap and its dependencies, jQuery & popper. Place them in the src/assets
directory. Add these lines to index.html:
<!DOCTYPE html>
<html lang="en">
  <head>
    <meta charset="utf-8" />
    <meta
      name="viewport"
      content="width=device-width, initial-scale=1, shrink-to-fit=no"
    />
    <title>my-online-store</title>
    <link rel="stylesheet" href="src/assets/bootstrap.min.css" />
  </head>
  <body>
    <div id="app"></div>
    <script src="/dist/build.js"></script>

    <script src="src/assets/jquery.slim.min.js"></script>
    <script src="src/assets/popper.min.js"></script>
    <script src="src/assets/bootstrap.min.js"></script>
  </body>
</html>
The first added line makes sure our app will utilize Bootstraps responsive
utilities, and the other lines actually pull in Bootstrap & its dependencies.
Note that you may want to use a CDN for these instead, or at the very least at
them to your build pipeline so they get pulled into the dist directory on
build.
Clear out the sample app and let’s start building our store’s UI. Edit
src/App.vue:
<template>
  <div id="app" class="container my-5">
    <h1>My online store</h1>
  </div>
</template>

<script>
export default {
  name: "app",
  data() {
    return {
      // Nothing for now.
    };
  },
};
</script>

<style>
/* Nothing for now */
</style>
In the template, I’ve added couple classes to the root element and replaced
everything inside of it with a single <h1> element.
In the script, I’ve replaced the (now unnecessary) msg property of the
returned data object. Also note that I’ve made some small code style changes.
The reason is because I’m following AirBnB’s popular JavScript Style
Guide. If you use a different style
guide, or don’t want to follow the same conventions I do, no worries. Just
ignore those small changes and code the way you want.
In the style portion, I’ve removed everything. I want to stick with using Bootstrap classes as much as possible for the sake of this tutorial, but feel free to modify the style any way you see fit.
If you save the file, your browser will automatically reload with the changes.
Displaying items
What good is an online store if it’s not selling anything? Let’s create an array
of items for sale. Place it in the return object for the data function.
data() {
  return {
    forSale: [
      { invId: 1, name: 'An Item', image: '//placehold.it/200', price: 999 },
      { invId: 2, name: 'Thing', image: '//placehold.it/200', price: 1499 },
      { invId: 3, name: 'Doo-dad', image: '//placehold.it/200', price: 499 },
      { invId: 4, name: 'Other thing', image: '//placehold.it/200', price: 299 },
    ],
  };
},
In a real world example, you would probably pull in this array from a database.
I won’t go in-depth with it here, but the basic idea in that case would be that
you use an HTTP client such as axios to
query an API that interfaces with your database when the Vue app is
created().
The forSale array we just created is a list of objects with the following
properties:
- invId: An inventory identifier. In our case, just an incrementing integer. This would usually be set by your database or inventory management system.
- name: The name of the item for sale.
- image: An image of the item. For now, we’re just using a 200 x 200 pixel placeholder image.
- price: The price of the item. Best practice says to store this as the lowest unit of measure that you’ll use. In this case, we’re storing the price as cents.
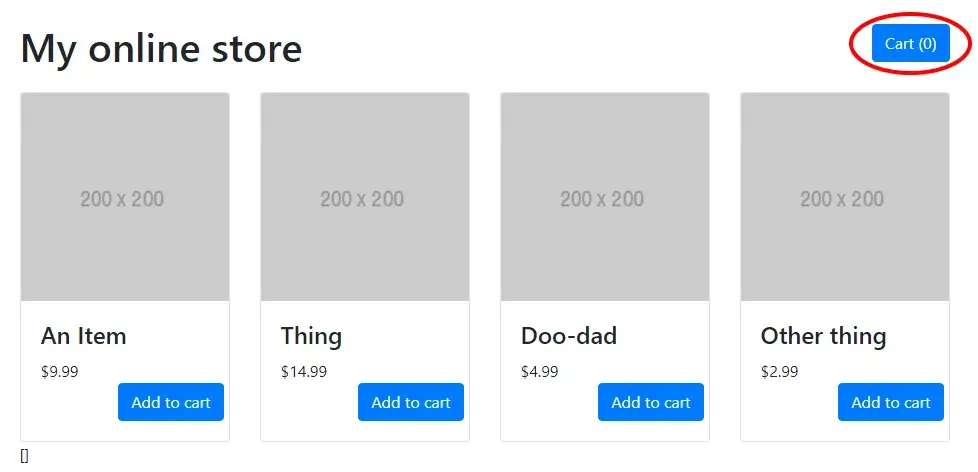
In the template, we can display these items with a v-for loop.
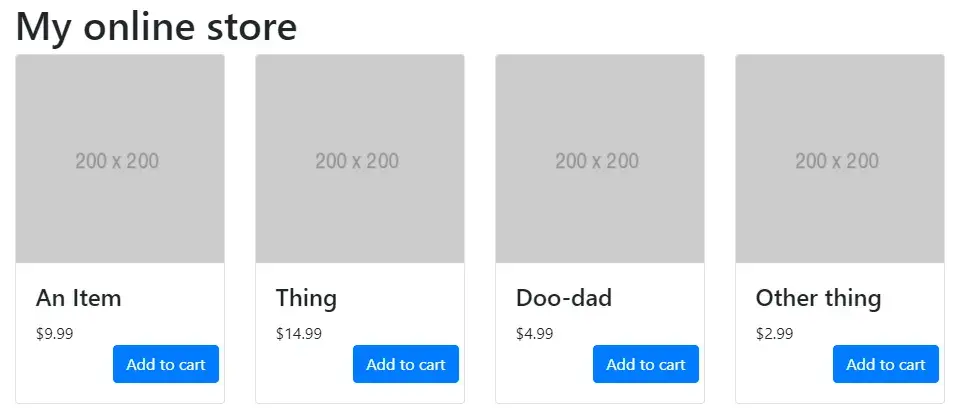
<template>
  <div id="app" class="container my-5">
    <h1>My online store</h1>

    <div class="row">
      <div class="col-md-3" v-for="item in forSale">
        {{ item.name }}
      </div>
    </div>
  </div>
</template>
First, we create a new row to contain all the items, then we create a new column
for each item. Bootstrap divides rows into columns of 12. So by using
col-md-3, on medium (and larger) screens, each item for sale will take up 3 /
12 columns = 4 items per row. On a smaller screen, each item will take up the
whole width of the row.
Inside each column, we’re just displaying the name of the item.

We can make it look prettier by taking advantage of Bootstrap’s card
component. Instead of just
displaying the bare name, we want to display the image, name, price, and a
button to “add to cart”. Inside the looping col, replace {{ item.name }} with:
<div class="col-md-3" v-for="item in forSale">
  <div class="card">
    <img :src="item.image" :alt="item.name" class="card-img-top" />
    <div class="card-body">
      <h4 class="card-title">{{ item.name }}</h4>
      <div class="card-text">${{ item.price / 100 }}</div>
      <div class="row justify-content-end">
        <button class="btn btn-primary">Add to cart</button>
      </div>
    </div>
  </div>
</div>
The src and alt attributes that start with a colon (:) are dynamic
properties set by Vue. They are set to the item’s image and name property,
respectively. The title of the card is the item’s name. The card’s text is the
item’s price divided by 100 to display it in dollars instead of cents.
Save the file and watch the app hot-reload.
Component-izing
At this point, I want to take a step back and show how we can break the item
card into a component. Whenever possible, you want to encapsulate reusable code
as a Vue component. Start by
creating a new file in the src directory called Item.vue:
<template>
  <!-- Nothing for now -->
</template>

<script>
export default {
  name: "item",
};
</script>
In the template, cut & paste the item col from src/App.vue. Also, remove the
v-for and replace any instances of item.x to just x.
<template>
  <div class="col-md-3">
    <div class="card">
      <img :src="image" :alt="name" class="card-img-top" />
      <div class="card-body">
        <h4 class="card-title">{{ name }}</h4>
        <div class="card-text">${{ price / 100 }}</div>
        <div class="row justify-content-end">
          <button class="btn btn-primary">Add to cart</button>
        </div>
      </div>
    </div>
  </div>
</template>
Our component will accept the item’s properties as Vue props. Set that up in the script.
<script>
export default {
  name: "item",
  props: ["invId", "name", "image", "price"],
};
</script>
Another area that can be cleaned up is the price display. Instead of putting the formatting logic in the template, we can apply a filter. Create the filter like so:
<script>
export default {
  name: 'item',
  props: ['invId', 'name', 'image', 'price'],
  filters: {
    dollars: num => `$${num / 100}`,
  },
</script>
And apply the filter in the template like so:
<div class="card-text">**{{ price | dollars }}**</div>Update: Vue 3 removed filters and they’re no longer supported. Insted, I recommend replacing them with method calls or computed properties.
Back in src/App.vue, we can place a single <Item> component where our
item code used to be.
<template>
  <div id="app" class="container my-5">
    <h1>My online store</h1>

    <div class="row">
      <Item
        v-for="item in forSale"
        :key="item.invId"
        :invId="item.invId"
        :name="item.name"
        :image="item.image"
        :price="item.price"
      />
    </div>
  </div>
</template>
We use v-for to loop over our forSale items and display an <Item>for
each one, passing the invId, name, image, and price to the component.
Take note of the key attribute here. It is required when rendering components
with v-for. It gives Vue a hint so that it can track each node’s identity, and
thus reuse and reorder existing elements. It needs to be uniquely tied to the
item, so item.invId works perfectly.
We still need to register the Item component with our app. Add these lines to
the script portion:
import Item from "./Item.vue";

export default {
  name: "app",
  data() {
    return {
      forSale: [
        /* snip */
      ],
    };
  },
  components: { Item },
};
The first added line imports our newly created Item single file component. The
other added lines register it with our main app.
In case you didn’t already know…
{
  Item,
}
…is shorthand for…
{
  Item: Item,
}
Save those files. The browser hot-reloads the app. Nothing has visibly changed, but now our app is displaying each item component. This helps you, as a developer, reason about your app more efficiently.
Adding vuex to manage state
We’ve got a problem. The “Add to cart” buttons do nothing.
We’ve got a bigger problem. Those buttons are in a child component of our main app, but the state of our app is contained in the main component. Furthermore, we’ll be building a cart component which will also share this state, as well. Many components of our app need access to view and mutate the same state.
At this point, the state management library vuex becomes attractive. Let’s take a step back again and add it in. In your terminal/command prompt:
npm i -S vuexCreate a new file in the src directory called store.js:
import Vue from "vue";
import Vuex from "vuex";

Vue.use(Vuex);

export default new Vuex.Store({
  state: {
    // TODO: Add state
  },
  getters: {
    // TODO: Add getters
  },
  mutations: {
    // TODO: Add mutations
  },
  actions: {
    // TODO: Add actions
  },
});
Edit src/main.js and add our store:
import Vue from "vue";
import App from "./App.vue";
import store from "./store";

new Vue({
  el: "#app",
  store,
  render: (h) => h(App),
});
With vuex in place, all current and future components we build have access to
the $store variable.
Right now, we only have one piece of state in our app: the forSale variable.
Let’s move that to src/store.js. Cut and paste the array from src/App.vue.
While we’re here, let’s also add an inCart array. It will be empty by default.
import Vue from "vue";
import Vuex from "vuex";

Vue.use(Vuex);

export default new Vuex.Store({
  state: {
    forSale: [
      { invId: 1, name: "An Item", image: "//placehold.it/200", price: 999 },
      { invId: 2, name: "Thing", image: "//placehold.it/200", price: 1499 },
      { invId: 3, name: "Doo-dad", image: "//placehold.it/200", price: 499 },
      {
        invId: 4,
        name: "Other thing",
        image: "//placehold.it/200",
        price: 299,
      },
    ],
    inCart: [],
  },
  getters: {
    // TODO: Add getters
  },
  mutations: {
    // TODO: Add mutations
  },
  actions: {
    // TODO: Add actions
  },
});
State should not be accessed directly in vuex. Instead, use getters. Create a getter for each of the arrays in our state.
getters: {
  forSale: state => state.forSale,
  inCart: state => state.inCart,
},
If you are unfamiliar with ES6 arrow functions…
forSale: state => state.forSale,…is (basically) equivalent to…
forSale: function (state) {
  return state.forSale;
},
Since our state will come from the store now, we can remove the data()
attribute from src/App.vue, And add a computed
property that
pulls the forSale getter from $store instead. We can do the same for
inCart, as well.
export default {
  name: "app",
  computed: {
    forSale() {
      return this.$store.getters.forSale;
    },
    inCart() {
      return this.$store.getters.inCart;
    },
  },
  components: {
    Item,
  },
};
Let’s also output the inCart property in the template. This is just temporary
so we can see what’s in the array.
<template>
  <div id="app" class="container my-5">
    <h1>My online store</h1>

    <div class="row">
      <Item <!-- snip --> />
    </div>

    {{ inCart }}
  </div>
</template>
Switching back to our live web app, everything besides the {{ inCart }} output
should appear as it was before we added vuex. Once again, on the surface nothing
has changed, but behind the scenes we have made our app ready to implement more
powerful features while remaining easy to reason about.
As a side note, I stopped my dev server in the terminal earlier to use it to
install vuex. If you did the same, you’ll need to run npm run dev again to
restart the dev server. Otherwise, continue on.
The “Add to cart” buttons
Now, let’s make those “Add to cart” buttons do something. In src/Item.vue,
bind this method to the @click handler on the button:
<button class="btn btn-primary" @click="addToCart(invId)">Add to cart</button>Add add the method itself:
export default {
  name: "item",
  props: ["invId", "name", "image", "price"],
  methods: {
    addToCart(invId) {
      this.$store.dispatch("addToCart", invId);
    },
  },
};
When the button is clicked, it fires the addToCart() method, passing the
invId of the item as an argument. This method dispatches to the store an
addToCart action with the invId as
a payload.
We must write the action in src/store.js:
actions: {
  addToCart(context, invId) { context.commit('ADD_TO_CART', invId); },
},
An action’s purpose is to perform arbitrary asynchronous operations, if any, and commit a mutation to the state. In this case, we have no async code to perform, so we just commit the mutation.
And now we write the mutation.
mutations: {
  ADD_TO_CART(state, invId) { state.inCart.push(invId); },
},
The mutation actually changes the state.
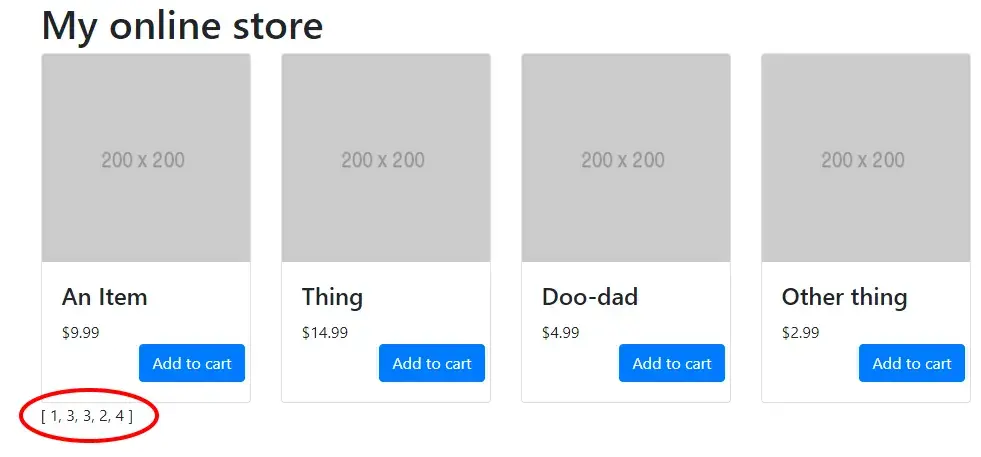
Save the this file and click any “Add to cart” button any number of times. Watch
as the inCart array is filled with item inventory ID numbers.
Displaying the cart
In the upper right corner, it would be nice to display a button users could click on and see their cart. The button should contain the number of items in their cart.
Add the button to the template. In src/App.vue, replace the header with the
following:
<template>
  <div id="app" class="container my-5">
    <div class="row mb-3">
      <div class="col-md-9">
        <h1>My online store</h1>
      </div>
      <div class="col-md-3">
        <button class="btn btn-primary">Cart ({{ inCart.length }})</button>
      </div>
    </div>

    <!-- snip -->
  </div>
</template>
We’ve added a new row with a margin on bottom. In that row there are two columns:
- Our header, from before.
- The cart button, which shows the length of the
inCartarray (number of items in cart) in parenthesis.
Since we’re going to be adding quite a bit more functionality to the shopping cart, now would be a good time to move it into its own component.
- Create
src/ShoppingCart.vue - Cut & paste the shopping cart button into the template
- Cut & paste the
inCartcomputed property into the script
<template>
  <button class="btn btn-primary">Cart ({{ inCart.length }})</button>
</template>

<script>
export default {
  name: "shoppingCart",
  computed: {
    inCart() {
      return this.$store.getters.inCart;
    },
  },
};
</script>
And clean up src/App.vue:
- Add the
<ShoppingCart />element where the button used to be - Import the component
- Register the component
- Finally, remove the reference to
{{ inCart }}in the template
<template>
  <div id="app" class="container my-5">
    <div class="row mb-3">
      <div class="col-md-9">
        <h1>My online store</h1>
      </div>
      <div class="col-md-3">**<ShoppingCart />**</div>
    </div>

    <div class="row">
      <Item
        v-for="item in forSale"
        :key="item.invId"
        :invId="item.invId"
        :name="item.name"
        :image="item.image"
        :price="item.price"
      />
    </div>

    <!-- No more inCart -->
  </div>
</template>

<script>
import Item from "./Item.vue";
import ShoppingCart from "./ShoppingCart.vue";

export default {
  name: "app",
  computed: {
    forSale() {
      return this.$store.getters.forSale;
    },
  },
  components: {
    Item,
    ShoppingCart,
  },
};
</script>
Back in src/ShoppingCart.vue, we can clean up the shopping cart item count
with a computed property.
<template>
<button class="btn btn-primary">Cart (**{{ numInCart }}**)</button>
</template>
<script>
export default {
name: "shoppingCart",
computed: {
inCart() {
return this.$store.getters.inCart;
},
numInCart() {
return this.inCart.length;
},
},
};
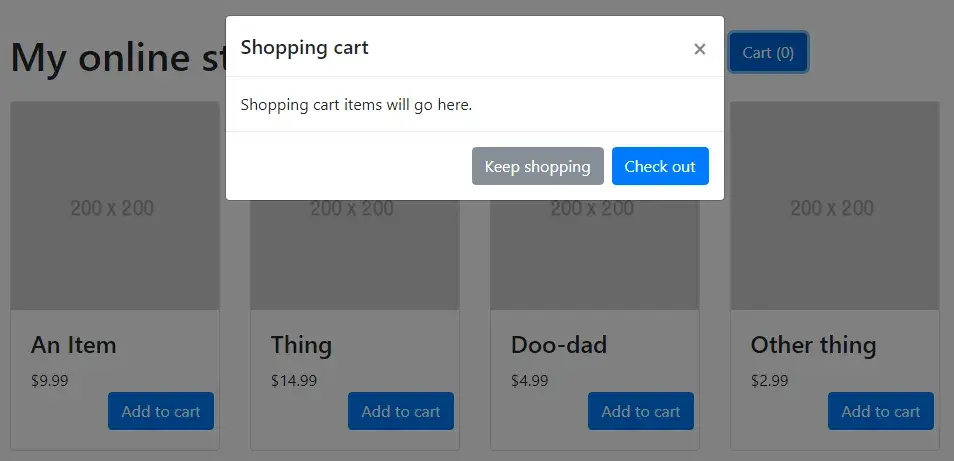
</script>Now, we want this button to display a modal with our items when clicked. This means that the component will actually consist of two pieces:
- the button
- the modal
Since Vue templates can only have a single root element, we wrap these both in a
single <div> tag.
<template>
  <div>
    <button class="btn btn-primary">Cart ({{ numInCart }})</button>

    <div id="shoppingCart" class="modal fade">
      <!-- The rest of the modal will go here -->
    </div>
  </div>
</template>
Bootstrap can handle toggling the modal.
<button
  class="btn btn-primary"
  data-toggle="modal"
  data-target="#shoppingCart"
>Cart ({{ numInCart }})</button>
The full modal itself looks like…
<div id="shoppingCart" class="modal fade">
<div class="modal-dialog">
<div class="modal-content">
<div class="modal-header">
<h5 class="modal-title">Shopping cart</h5>
<button class="close" data-dismiss="modal">
×
</button>
</div>
<div class="modal-body">
Shopping cart items will go here.
</div>
<div class="modal-footer">
<button class="btn btn-secondary" data-dismiss="modal">Keep shopping</button>
<button class="btn btn-primary">Check out</button>
</div>
</div>
</div>
</div>Back on our live web app, clicking on the cart button pops up the modal.
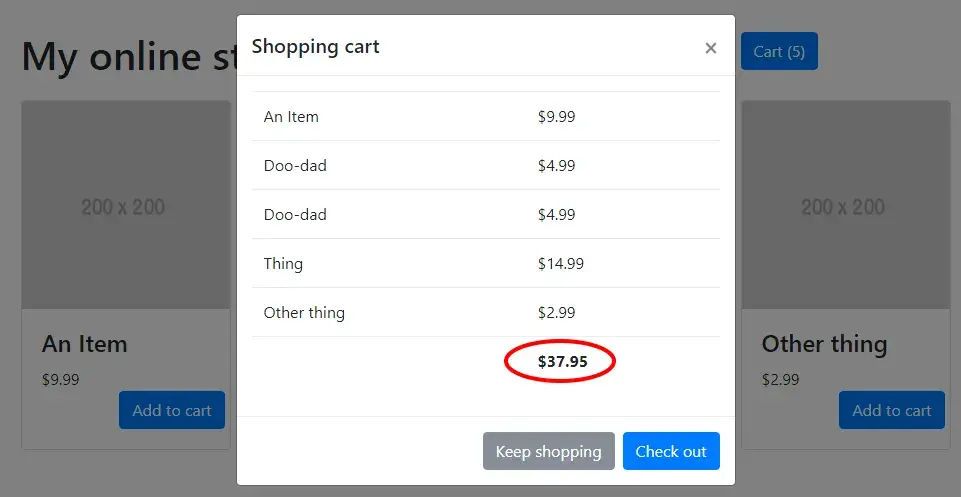
A table of items
There are no items displayed right now. Let’s write code to display them. We
need a new computed property that returns more than just an array of inventory
ID numbers. We need one that returns an array of whole items so we can display
the name and price. The new computed property will be called cart().
export default {
  name: "shoppingCart",
  computed: {
    /* snip */
    cart() {
      return this.$store.getters.inCart.map((cartItem) => {
        return this.$store.getters.forSale.find((forSaleItem) => {
          return cartItem === forSaleItem.invId;
        });
      });
    },
  },
};
This one is a little complex, but follow along. The new cart() property uses
.map()
to loop over the inCart state array (an array containing the inventory ID
numbers of items in the cart). During each iteration of the loop, it uses
.find()
to filter through the forSale state array. .find() picks out the item whose
invId matches the ID in the cart. Basically, it takes a list of item IDs and
returns the list of items they represent.
Now, in the template, we want to display this computed property in a tabular
format. Thus, a <table> works nicely here. We can use v-for to display
one row per item in the cart. In the <div class="modal-body"> div,
replace “Shopping cart items will go here” with:
<table class="table">
  <tbody>
    <tr v-for="item in cart">
      <td>{{ item.name }}</td>
      <td>{{ item.price | dollars }}</td>
    </tr>
  </tbody>
</table>
Notice we’re using the dollars filter again. But it won’t work right now! We
put that filter in the Item component, and we’re working in the ShoppingCart
component.
Keep the code DRY
One solution is to repeat yourself and copy the filter here, too. The nicer
solution is to place all our filters in a module that we can reference whenever
we need. Although we only have one filter at the moment, this style allows us to
keep our code clean in the event you create new filters down the road. Create
src/filters.js.
const dollars = (num) => `$${num / 100}`;

export { dollars };

export default {
  dollars,
};
The first line defines our filter like before. The second line exports it as a named function. The last lines export an object containing all our filters (only one right now).
Going back to src/ShoppingCart.vue, simply import the filter and register it.
import { dollars } from "./filters";

export default {
  name: "shoppingCart",
  /* snip */
  filters: { dollars },
};
It’s not necessary here, but if you want to import all filters, you could do…
import filters from "./filters";

export default {
  name: "shoppingCart",
  /* snip */
  filters,
};
Repeat in src/Item.vue.
import { dollars } from "./filters";

export default {
  name: "item",
  props: ["invId", "name", "image", "price"],
  filters: { dollars }, // Replaces old filter definition
  methods: {
    addToCart(invId) {
      this.$store.dispatch("addToCart", invId);
    },
  },
};
The nice part is that if you ever decide to change the dollars filter for any
reason (e.g. you want to add “USD” before the dollar sign), you only have to do
it once in src/filters.js and it will be updated throughout your app.
Going back to the live web app, the modal now displays the contents of the shopping cart.

The total row
What about a total? That’s an easy job for a computed property using the
.reduce()
method.
Add a new row to our table. The first cell is blank, the second cell contains the total.
<table class="table">
  <tbody>
    <tr v-for="item in cart">
      <td>{{ item.name }}</td>
      <td>{{ item.price | dollars }}</td>
    </tr>
    <tr>
      <th></th>
      <th>{{ total | dollars }}</th>
    </tr>
  </tbody>
</table>
And add the computed property.
export default {
  name: "shoppingCart",
  computed: {
    /* snip */
    total() {
      return this.cart.reduce((acc, cur) => acc + cur.price, 0);
    },
  },
  /* snip */
};
.reduce() applies a function against an accumulator and each element in the
array to reduce it to a single value. In this case, the function starts at 0 and
adds the accumulator + the next item’s price on each iteration.
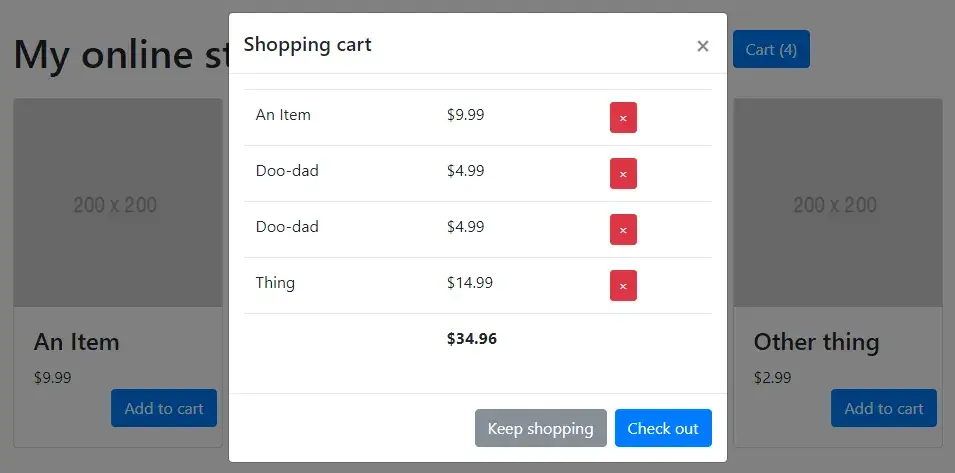
Removing items out of the cart
Only a few basic features remain. What if the user wants to remove an item from the shopping cart. Add another column to our table with a removal button.
<table class="table">
<tbody>
<tr v-for="item in cart">
<td>{{ item.name }}</td>
<td>{{ item.price | dollars }}</td>
<td>
<button class="btn btn-sm btn-danger">×</button>
</td>
</tr>
<tr>
<th></th>
<th>{{ total | dollars }}</th>
<th></th>
</tr>
</tbody>
</table>Don’t forget to add another blank cell in the column row, as well. It’s not a necessity, but it’s semantically correct.
Removing an item from the cart is a mutation of the state. Therefor, the button
should fire a method that dispatches an action to remove an item from the
inCart store array. We can reference the item to remove by its index in the
array. Modify the v-for loop and the button to include the index.
<table class="table">
<tbody>
<tr v-for="(item, index) in cart">
<td>{{ item.name }}</td>
<td>{{ item.price | dollars }}</td>
<td>
<button class="btn btn-sm btn-danger" @click="removeFromCart(index)>×</button>
</td>
</tr>
<tr>
<th></th>
<th>{{ total | dollars }}</th>
<th></th>
</tr>
</tbody>
</table>Note that we’re changing the code in two places above.
Now add the removeFromCart() method. It dispatches an event to our store
with the item’s array index as the payload.
export default {
  name: "shoppingCart",
  /* snip */
  methods: {
    removeFromCart(index) {
      this.$store.dispatch("removeFromCart", index);
    },
  },
};
Define the action in src/store.js:
export default new Vuex.Store({
  state: {
    /* snip */
  },
  getters: {
    /* snip */
  },
  mutations: {
    /* snip */
  },
  actions: {
    /* snip */
    removeFromCart(context, index) {
      context.commit("REMOVE_FROM_CART", index);
    },
  },
});
Again, since there’s no async operation here, we can just commit the mutation. Here’s the mutation:
export default new Vuex.Store({
  state: { /* snip */ },
  getters: { /* snip */ },
  mutations: {
    /* snip */
    REMOVE_FROM_CART(state, index) { state.inCart.splice(index, 1); },
  actions: { /* snip */ },
});
The
.splice()
method changes the contents of an array by removing existing elements and/or
adding new elements. The first argument indicates where to start splicing from,
in our case the index captured when the removal button was clicked. The second
argument indicates how many items to splice, in our case, just one. Any further
arguments contain any items you want to put in place of the spliced elements.
Since we pass no further arguments, nothing gets added to the array, only
deleted.
Our app now has red buttons next to each item in the shopping cart. Clicking on it removes the item on that row.
Keep developing
That’s as far as we’ll go in this tutorial. But there are many more features that could or should be added. For example, what about adding a quantity column?
I’ll end by saying that the “Check out” button would be handled by a
checkOut() method that would move the application state into a “checkout”
mode, POST to a checkout API, or something similar. No matter the actual
operation, just remember that the inventory ID for every item the user wants to
purchase is contained in $store.getters.inCart.
The code for this tutorial can be found online at https://github.com/travishorn/vue-online-store-demo/tree/vue2 . Feel free to fork and modify for your own purposes.