 Travis Horn
Installing Arch Linux

Lately I’ve been experimenting with more customizable distributions of Linux. My only previous experience with Linux was Ubuntu. It’s a nice distribution for new users. The installation is incredibly easy to follow nowadays. It comes with a lot of cool features and utilities and basically works “out-of-the-box.” However, not everyone needs those nice features and built-in tools. For power users who want a more customizable experience with less bloat, a smaller and more configurable distribution can be a better choice.
That’s where I was when I started to look at Arch. From the very beginning, everything is under your control. You get to decide everything about the installation. You get to decide what tools to install. The features you install are so much more configurable than the more mainstream defaults in Ubuntu.
To be clear, there are many distributions that have similar levels of control. Gentoo is another one that comes to mind. But Arch is the one I landed on.
However, all of that control comes at the cost of a more difficult installation and setup. I’m going to document everything I’ve done to install and set up Arch to my needs. If you’re new to this like I was, follow along and see how I did it. I hope that, along the way, you’ll discover the basics and start to customize your installation like I did.
In this article, I’ll go through the whole installation process. In future articles, I’ll talk about installing and using a window manager, status bar, terminal, and Vim.
A big thanks goes to DistroTube on YouTube. I actually started by following his Arch Linux Installation Guide 2020. This article follows that guide pretty closely. Some of the steps are modified to match my experience with the process.
Download the ISO
You will need to download a copy of Arch Linux first so you can load it onto some media and install it.
Go to https://archlinux.org/download/
Downloading via BitTorrent is recommended as it spreads the data transfer across multiple peers. It can also be faster. If you have a client like qBittorrent installed, consider downloading via BitTorrent and keeping the torrent seeded for a while after downloading so you can help others just like you download it in the future.
To download via BitTorrent, click Magnet link for 2021.12.01. The version might be different if you are reading this a little later after this article was published. That’s okay.
If you aren’t able or don’t want to download via BitTorrent, scroll down to the HTTP Direct Downloads section and find a mirror in your geographical location. Once you find it, click on it.
Click on archlinux-2021.12.01-x86_64.iso to download the ISO. Again, the version number might be different if you’re reading this a little later after this article was published. That’s okay.
Prepare the installation media
If you only want to run Arch inside a virtual machine on your existing host machine, you can skip this section. Otherwise, keep reading to learn how to create a bootable flash drive with the Arch ISO loaded.
Go to https://rufus.ie
Under the Download section, click Rufus 3.17 (the version number might be different).
Once the download completes, run the installer and follow its instructions to install Rufus.
Plug a USB flash drive into your machine. Warning: The contents of this flash drive will be erased in the next few steps. Make a copy if you don’t want to lose anything.
Start Rufus
Under Device, select the flash drive you want to use.
Under Boot selection, click SELECT. Navigate to the Arch ISO you downloaded in the last section and click Open.
Click START
Once Rufus is finished, remove the flash drive from your machine and plug it into the target machine on which you want to install Arch. Make sure the machine is off.
Set up a virtual machine
If you are installing Arch to a physical machine, you can skip this step. Otherwise, keep reading to learn how to set up a virtual machine using VirtualBox.
If you don’t already have VirtualBox installed, go to https://www.virtualbox.org and click on Download VirtualBox 6.1 (the version number might be different).
Click on Windows hosts. If you’re not using Windows, you can probably still follow this guide, but you’ll probably have to change a few steps.
Once the download finishes, run the installer and follow its instructions to install VirtualBox.
Start VirtualBox
Click New to create a new virtual machine
Give it any name you like. For example, Arch Linux.
Under Type, choose Linux
Under Version, choose Arch Linux (64-bit) and click Next
For Memory size, enter 4096 MB or more and click Next
Under Hard disk, leave Create a virtual hard disk now selected and click Create
Under Hard disk file type, leave VDI selected and click Next
Under Storage on physical hard disk, leave Dynamically allocated selected and click Next
Under File location and size, select where you want the hard disk file to be stored on your physical machine. The default may be fine.
For the size, enter 10 GB or more. You’ll probably be okay will less, but I like to be safe. If you plan to actually use this machine instead of just testing it out, you’ll probably want much more.
Click Create
With the new virtual machine selected, click Settings
Click System
On the Motherboard tab, check the box for Enable EFI
Go to the Processor tab
Change Processor(s) to 2 or more. You might be fine with 1, but I like to be safe.
Click Display
Under Video Memory, enter 128 MB
Click Storage
Select the empty optical drive. The icon looks like a CD
Under Attributes, click the CD icon next to Optical Drive
Click Choose a disk file…
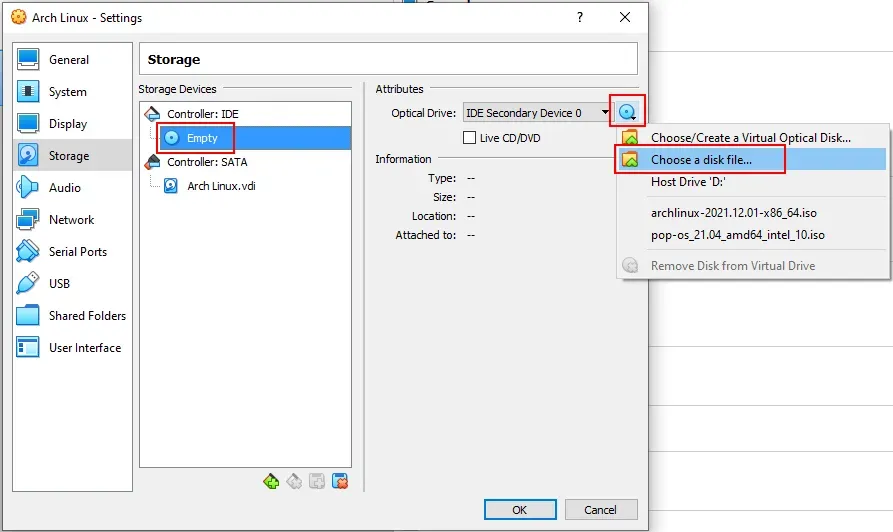
Select the Arch ISO you downloaded earlier and click Open
Click OK
Install the Operating System
Once you have a machine (physical or virtual) ready to go with the installation media inserted, you’re ready to boot it up and start installing.
Boot up the machine. In VirtualBox, you can do this by making sure the virtual machine is selected and clicking Start
On a physical machine, you may need to press a specific key on the keyboard to access the boot menu. Watch your screen for instructions. If you miss it, you can restart the machine and try again. The goal is to get to the boot menu and boot from the inserted USB drive that has the Arch installation ISO loaded.
On VirtualBox, the virtual machine will automatically boot into the Arch installation.
Make sure Arch Linux install medium (x86_64, UEFI) is selected and press Enter. This option is also selected automatically if you don’t make a selection with 15 seconds.
Once the machine is booted, you’ll see a prompt labeled root@archiso ~#
Set the keymap
The default keymap is us and is probably the correct choice if you use a
keyboard made for use in the United States. If you use that, you can skip this
step. Otherwise keep reading to learn how to change your keymap.
List available keymaps
ls /usr/share/kbd/keymaps/**/*.map.gz | lessKeep pressing Enter to scroll through the list. When you find your keymap, write
down its name. For example, if you use a German keymap, it’s labeled
de-latin1. Once you have your keymap written down, press q to get back to
a prompt.
Load your keymap (replace de-latin1 with your actual keymap)
loadkeys de-latin1Check internet access and time
Make sure you have internet access by pinging a highly available domain like Google
ping google.comAs long as some bytes are returned, you have internet access. Press Ctrl + c to stop pinging.
Synchronize your system clock
timedatectl set-ntp true
timedatectl status
Check that NTP service is active and System clock synchronized is yes
Partition the disk and generate the filesystem
View disk information
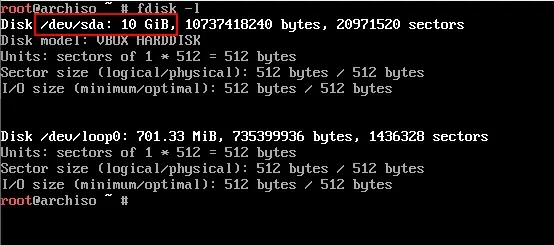
fdisk -lIf you’re installing on a physical machine with your own setup of hard disks, you’ll have to use your own judgement on how to partition the disk(s). If you’re following along with this guide on VirtualBox, you’ll most likely have two disks listed:
- The 10 GiB disk (or whatever size you set it to during virtual machine setup)
- The “loop” disk. Arch sets this up automatically. It’s not a “real” disk. You can ignore it.
Make a note of the path of the 10 GiB disk. It’s probably /dev/sda
Start fdisk to partition that disk. (replace /dev/sda with the path to your 10
GiB disk, or the disk you on which you want to install Arch)
fdisk /dev/sdaType g and press Enter to create a new GPT disklabel
Add an EFI partition
Type n and press Enter to add a new partition
Press Enter to accept the default partition type of primary
Press Enter to accept the default partition number of 1
Press Enter to accept the default first sector of 2048
Type +550M and press Enter to set the new partition’s size to 550 MiB.
This will be your EFI partition and is recommended to be this exact size.
Type t and press Enter to change the partition’s type
Type uefi and press Enter to select EFI (FAT-12/16/32) as the type
Add a swap partition
This section is probably not necessary if you are installing Arch Linux as a virtual machine. But it is very beneficial if you are installing it on bare hardware.
Type n and press Enter to add a new partition
Press Enter to accept the default partition type
Press Enter to accept the default partition number
Press Enter to accept the default first sector
Type +2G and press Enter to set the new partition’s size to 2 GiB. This is
the swap partition and 2 GiB is a good size.
Type t and press Enter to change the partition’s type
Press Enter to select the default partition number of 2
Type 19 and press Enter to select Linux swap as the type
Add the main partition
Type n and press Enter to add a new partition
Press Enter to accept the default partition type
Press Enter to accept the default partition number
Press Enter to accept the default first sector
Press Enter to select the default last sector. This will make the partition take up all the remaining space on the disk. Since this is the main filesystem partition, we don’t need to change the partition type because it’s already Linux
With all the partitions configured, type w and press Enter to write the
partition table information to the disk and exit.
Make a FAT32 filesystem on the first partition (your EFI partition)
mkfs.fat -F32 /dev/sda1If you created a swap partition, set it up on the second partition
mkswap /dev/sda2
swapon /dev/sda2
Make an EXT4 filesystem on the main partition. This may be /dev/sda2 or
/dev/sda3 depending on if you set up a swap partition or not
mkfs.ext4 /dev/sda2Mount the new partition
mount /dev/sda2 /mntUse pacstrap to install the base Arch operating system, the Linux kernel, and the firmware for Linux onto the mounted partition. This may take a few minutes.
pacstrap /mnt base linux linux-firmwareGenerate the filesystem table
genfstab -U /mnt >> /mnt/etc/fstabChange into the root directory of your new installation.
arch-chroot /mntThe prompt should change to [root@archiso /]# to indicate you are now on the
root of the mounted filesystem.
Install a text editor
Some of the next steps require editing text files. You’ll have to install a text editor. This guide will use Nano but feel free to use another editor if you’re more comfortable with one. I highly recommend Vim, but it can be tricky to use for a first-timer.
Install Nano
pacman -S nanoWhen asked to proceed with the installation, press Enter to accept the default of Y. pacman will always ask this. For the remainder of this guide, just press Enter each time you’re presented with that question.
Set timezone, clock, locale, and hostname
List all available timezone regions
ls /usr/share/zoneinfoFind the one that matches your region and write it down for later. For example,
mine is America
List timezone cities in your region (replace America with your region)
ls /usr/share/zoneinfo/AmericaFind the city that matches your timezone. It may not be the actual city you live
in. Instead, try to find a city that is in the same timezone and follows the
same timezone rules as you. For example, mine is Chicago. Write this down for
the next step
Create a link between your timezone and the localtime file. This sets your
timezone. Replace America/Chicago with the region and city that you wrote down
earlier
ln -sf /usr/share/zoneinfo/America/Chicago /etc/localtimeSet the hardware clock to the system time
hwclock -wEdit the locale generator file
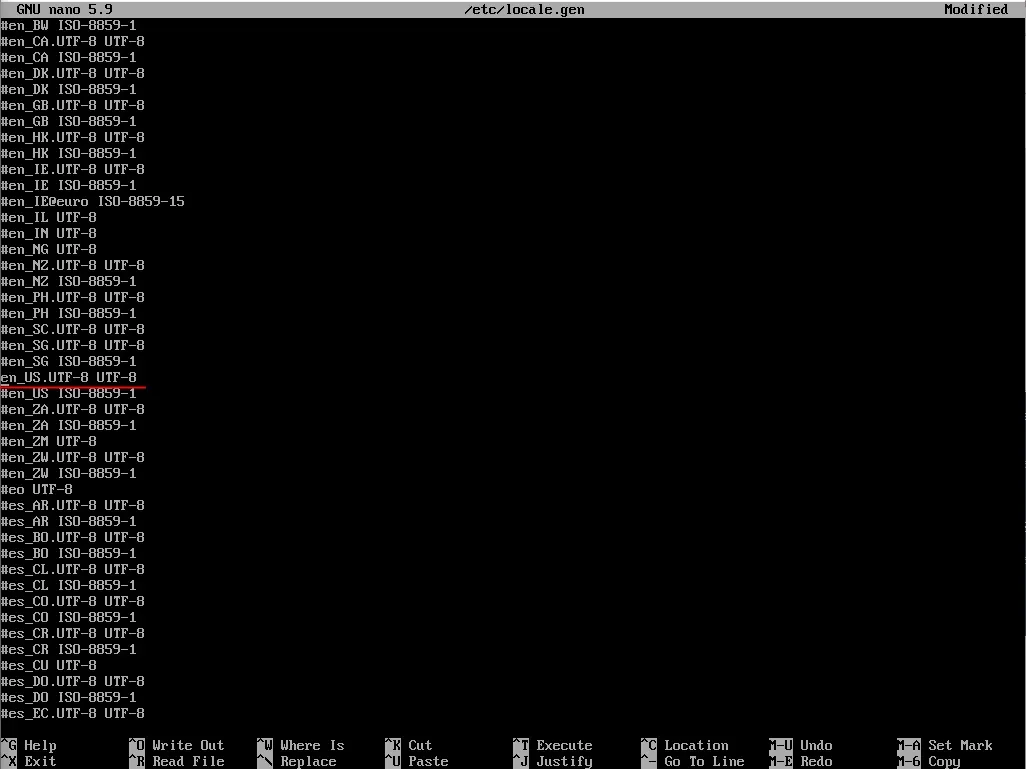
nano /etc/locale.genScroll down and find the line with your locale. For example, #en_US.UTF-8 UTF-8
The # indicates that this line is a “comment” that should be ignored. Since we
want to actually use that locale, delete the # to “un-comment” the line.
Repeat for all locales you will use. Most people will probably only use one.
Most US English speakers will use en_US.UTF-8 UTF-8
Press Ctrl + x to exit Nano. It will ask you if you want to save the file.
Press y for Yes. It will ask for the file name. Press Enter to
accept the default of /etc/locale.gen
Generate locales
locale-genEdit the hostname file. It probably doesn’t exist, yet. That’s okay.
nano /etc/hostnameType the hostname you want to use for this machine. For example, arch
Exit and save the file
Edit the hosts file
nano /etc/hostsThere are already two lines in this file. Add the following three lines below
them. Make sure to change arch to whatever hostname you saved in the steps
earlier
127.0.0.1 localhost
::1       localhost
127.0.1.1 arch.localdomain arch
Exit and save the file
Create users, set passwords and privileges
Change the root user’s password
passwdEnter a strong and memorable password. For security reasons it won’t appear like you’re typing anything on screen. Simply press Enter when you’re finished typing the password. Arch will ask you to type the password again for confirmation.
Create a new user. Replace travis below with your name or whatever username
you want to primarily use
useradd -m travisChange the new user’s password
passwd travisAgain, choose a strong and memorable password. It should be different than the root user’s password.
Add the user to specific groups with special privileges
usermod -aG wheel,audio,video,optical,storage travisRepeat for as many users as you’d like to enable on this machine. You may
consider leaving wheel off of the list for some users. Anyone added to the
wheel group will essentially have system administrator privileges.
When you want to have root-level access while logged in as a non-root user,
you’ll use the sudo command. That command is not installed yet.
Install sudo
pacman -S sudoEdit the sudoers file
EDITOR=nano visudoScroll down and find the following line
# %wheel ALL=(ALL) ALLUn-comment that line by deleting the # at the beginning. Exit and save the
file.
Install the boot manager
Install the GRUB boot manager installer and other necessary tools for booting
pacman -S grub efibootmgrMake a new EFI boot directory and mount your EFI partition to it
mkdir /boot/EFI
mount /dev/sda1 /boot/EFI
Install GRUB
grub-install --target=x86_64-efi --bootloader-id=grub_uefi --recheckGenerate the GRUB configuration file
grub-mkconfig -o /boot/grub/grub.cfgInstall other utilities
Install network manager and enable it
pacman -S networkmanager
systemctl enable NetworkManager
If you’re using VirtualBox, install and enable the VirtualBox guest utilities
pacman -S virtualbox-guest-utils
systemctl enable vboxservice.service
Exit and shut down
Exit out of arch-chroot
exitUnmount the live image
umount -l /mntShut the machine down
shutdown nowIf installing on a physical machine, unplug the USB flash drive and skip to the next section. Otherwise, keep reading to learn how to eject the Arch ISO in VirtualBox.
In VirtualBox, click Settings
Click Storage
Click to select the optical drive. It has the icon of a CD and may be named something like archlinux-2021.12.01-x86_64.iso
Under Attributes, click the icon of a CD and then click Remove Disc from Virtual Drive
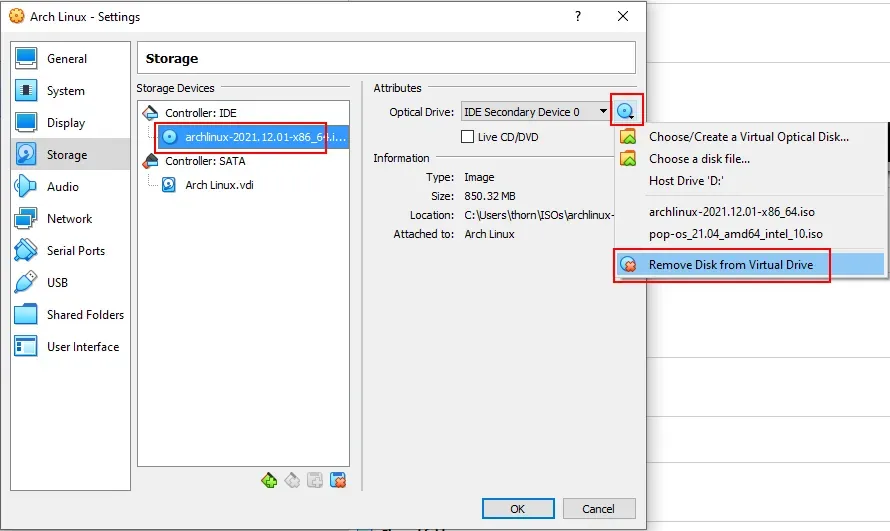
Click OK
Boot up
Turn on the machine. If you’re using VirtualBox, make sure the virtual machine is selected and click Start
In the GNU GRUB menu, make sure Arch Linux is selected and press Enter. If you don’t make a selection within 5 seconds, this option will be selected automatically
Once you get to the login screen, enter the username and password you chose when installing the operating system.
Congratulations! You have a bare minimum installation of Arch Linux.
There’s no GUI and almost no tools to use right now. That’s what makes Arch great. From here, this machine can become anything. It doesn’t assume anything. In the next few articles, I’ll talk about installing, configuring, and using a window manager, status bar, terminal, and Vim.
If you’re done with the machine for the day, you can shut it down with the same command we used earlier. But since you’re not logged in as root, you’ll need to use sudo
sudo shutdown nowAs stated earlier, sudo lets a non-root user run root-level commands as long as they’re part of the wheel group. Each session, sudo will ask you to re-enter your password as a security measure.
Keep an eye out for future articles in this series where I’ll talk about installing and using a window manager, status bar, terminal, and Vim.