


I created a free progressive web app which helps people with diabetes find information on the food they eat.
You can use the app by clicking the tile below. Diabetes Food Database Food information for people with diabetes.dfdb.netlify.com
Or you can watch this very short demo.
Would you like to contribute?
The database only has a small number of food items in it right now but everything is open source! If you’re interested in contributing, pull requests are very welcomed.
Building the app
The app is built with the help of quite a few open source projects including Axios, Fuse, Icons8, Pluralize, and Vue. The whole thing is hosted on Netlify.
There are really three pieces at work here:
The data
The back-end search API based on a single lambda function
The pretty front-end user interface
The data
I started by writing a strictly formatted “database” using JSON. It looks something like this:
{
  "foods": [
    {
      "name": "sugar",
      "displayName": "Sugar",
      "alternateNames": ["glucose"],
      "level": 1,
      "explanation": "Sugar is not easily processed by a ..snip..",
      "suggestions": "Sugar is important for bodily ..snip..",
      "ingredients": []
    },
    ..snip..
  ]
}
The back-end
Once I had the data structure there, I started building the API. I wrote a separate article on writing Netlify lambda functions from scratch, which I followed as a template.
The search is fairly simple, thanks to the help of Pluralize and Fuse.
First, I import the dependencies…
const { singular } = require('pluralize');
const Fuse = require('fuse.js');
const { foods } = require('../database.json');
In addition to Pluralize and Fuse, you can see I’m importing the data, as well.
Next, I create the search engine based on the data.
const fuse = new Fuse(foods, {
  keys: ['name', 'alternateNames'],
  threshold: 0.4,
});
When users do a search, Fuse looks at the name and alternateNames keys for partial and exact matches.
Now for the main function.
exports.handler = (event, context, callback) => {
  const q = singular(event.queryStringParameters.q);

// Do something with the query here
};
Inside the main function, we pull out the user’s query and singularize it. If the user searched for “french fries” Pluralize’s singular() function transforms it to “french fry” which has a better chance to match a name in the database, as those are all singular.
Next we use Fuse to do a search.
const matches = fuse.search(q);
Then we prepare the results.
const results = {
  query: event.queryStringParameters.q,
  interpretation: q,
  resultCount: matches.length,
  results: matches,
};
When the API returns results, it can be useful to give some meta information like how the API interpreted the query (“french fry” vs “french fries”) or how many results were found.
With the results object ready, we finally respond.
callback(null, {
    statusCode: 200,
    headers: {
      'Content-Type': 'application/json',
      'Access-Control-Allow-Origin': '*',
      'Access-Control-Allow-Headers': 'Origin, X-Requested-With, Content-Type, Accept',
    },
    body: JSON.stringify(results),
  });
We tell the client that the request was successful (statusCode: 200), set the content type as JSON, and set CORS headers so the API can be accessed from anywhere. The body of the response is the stringified results.
That’s it for the back-end search API!
The front-end
For the front-end, I used Vue single file components. I wrote up a custom solution, but the easiest way to get started with Vue SFCs yourself is using the Vue CLI.
The app is made up of five components:
The main app
A search bar
An error message (if the API isn’t working as expected)
A results listing
A food item card
You can see how I built each of these in the open source repository on GitHub.
The basic idea is that the search bar component emits an event with a query…
<template>
  <form [@submit](http://twitter.com/submit).prevent="search">
    <input type="text" v-model="q">
  </form>
</template>

<script>
export default {
  name: 'SearchBar',
  data() {
    return { q: '' };
  },
  methods: {
    search() {
      this.$emit('search', this.q);
    },
  },
};
</script>
The main app uses Axios to query the API and sets the results…
<script>
import axios from 'axios';

export default {
  name: 'app',
  data() {
    return { results: [] };
  },
  methods: {
    search(q) {
      axios.get(`http://localhost:9000/search?q=${q}`)
        .then((response) => {
          this.results = response.data.results;
        });
      });
    },
  },
};
</script>
The results listing component iterates over the results and outputs a food item card for each item.
<template>
  <div>
    <FoodItem v-for="food in results"
              :key="food.name"
              :food="food" />
  </div>
</template>

<script>
import FoodItem from './FoodItem.vue';

export default {
  name: 'ResultsListing',
  props: ['results'],
  components: { FoodItem },
};
</script>
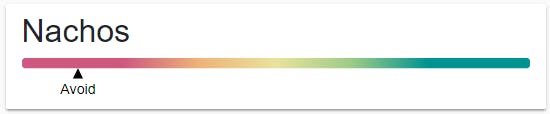
The food item cards display the data, including a red-to-green food safety chart written using SVG.
<template>
  <div class="card">
    <div class="card-body">
      <h2>{{ food.displayName }}</h2>

      <svg viewBox="0 0 500 40">
        <defs>
          <linearGradient id="redGreen">
            <stop offset="20%" stop-color="#cf597e" />
            <stop offset="35%" stop-color="#eeb479" />
            <stop offset="50%" stop-color="#e9e29c" />
            <stop offset="65%" stop-color="#9ccb86" />
            <stop offset="80%" stop-color="#009392" />
          </linearGradient>
        </defs>

        <rect width="500"
              height="10"
              rx="3"
              ry="3"
              fill="url(#redGreen)" />
        <g :transform="indicatorTranslation">
          <path d="M 5 0 L 10 10 L 0 10 Z" />
          <text x="5" y="25" text-anchor="middle">
            {{ indicatorText }}
          </text>
        </g>
      </svg>

      <h3>Explanation</h3>
      <p>{{ food.explanation }}</p>
      <h3>Suggestions</h3>
      <p>{{ food.suggestions }}</p>
    </div>
  </div>
</template>

<script>
export default {
  name: 'FoodItem',
  props: ['food'],
  computed: {
    indicatorTranslation() {
      const x = (this.food.level - 1) * 100 + 50;
      return `translate(${x} 10)`;
    },
    indicatorText() {
      const levels = ['Avoid', 'Caution', 'Okay', 'Good', 'Great'];
      return levels[this.food.level - 1];
    },
  },
};
</script>
The chart is probably the trickiest part to understand. It’s made up of three elements:
the rectangle with gradient
the triangle indicator
the indicator text (“Avoid”, “Caution”, etc)
The rectangle uses a linear gradient defined in the SVG’s <defs>.
The indicator triangle and text are simple to understand until it comes to positioning them. For that, I grouped them up with a <g> and translated it based on an equation.
indicatorTranslation() {
  const x = (this.food.level - 1) * 100 + 50;
  return `translate(${x} 10)`;
},
The y-axis translation is easy. It’s always the same. I made it 10 so it’s below the gradient rectangle.
The x-axis translation, though, depends on what “level” the food is (“Avoid”, “Caution”, etc).
In the database, each food has a level from 1 to 5. 1 is the worst and 5 is the best. The indicator for worst foods (1) will be near the left (low x-axis number) and the best foods (5) will be near the right (high x-axis number).
We need to separate the width of the chart into “blocks”. The SVG chart is 500 pixels wide and we have 5 levels. 500 / 5 = 100. So each block is 100 pixels wide.
Knowing this, the equation takes the level (1–5) and multiplies it by 100.
If we use that number as the x-axis for the indicator, it will be on the very left edge of the block. To fix this, we add 50 so the indicator is in the middle of the block (100 / 2 = 50).
We’re almost done, but our SVG chart x-axis starts at 0 and our levels start at 1. This means everything is offset by a whole “block” (100 pixels). To correct this, we simply subtract 1 from the level before running the rest of the equation.
The result is a pretty card with a pretty chart.
Again, I could use the help of some contributors who want to add items to the database. You can find more information about that below. The database needs more food items · Issue #1 · travishorn/diabetes-food-database I’ve started with about 30 food items in the database, which is laughable when you consider all the different foods out…github.com