 Travis Horn
Rolling Your Own Node.js Continuous Deployment on Linux

You don’t need a bloated, expensive CI/CD platform to deploy your Node.js apps. You can roll your own “push-to-deploy” pipeline directly on your VPS. This method is lightweight, strictly adheres to the principle of least privilege, and feels like magic. Here is your complete, step-by-step guide to building it from scratch.
Note: I wrote a similar guide to this a few years ago, but this is the updated setup I’m currently using, which is simpler and more secure. It takes into account all of the lessons I’ve learned since I’ve been maintaining CD on my own like this.
This guide assumes…
- you are using a Debian-based system,
- you have
rootaccess (sudoprivileges will work great), git,nodejs, andnpmare installed, and- you already have a Node.js project that serves HTTP content.
Create Dedicated Users
We need two separate users: one to securely handle Git connections, and one to securely run the application.
-
Create a
gituser:sudo useradd --system --shell /usr/bin/git-shell git -
Create a
myappuser:sudo useradd --system --shell /usr/sbin/nologin --home-dir /nonexistent myappImportant: Don’t actually name it
myapp; name it after the app you’re deploying. You should make one of these users per app.
Configure SSH Access
You need to allow your development machine(s) to authenticate as the git user.
-
Create a
.sshdirectory for thegituser:sudo mkdir -p /home/git/.ssh -
Secure the directory so only the
gituser can read/write/execute it:sudo chmod 700 /home/git/.ssh -
Open the authorized keys file in your text editor:
sudo edit /home/git/.ssh/authorized_keys -
Paste your developer public SSH key(s) (e.g., the contents of
~/.ssh/id_ed25519.pub) into this file and save. Don’t have a public SSH key? Check out this guide. -
Secure the file so only the
gituser can read/write to it:sudo chmod 600 /home/git/.ssh/authorized_keys -
Set the
gituser as the owner of.sshand its contents:sudo chown -R git:git /home/git/.ssh
Set Up an Application Directory
We need to create a directory structure where the app will live. You should do these steps for every app you plan to deploy.
-
Create a directory to hold scripts related to the app:
sudo mkdir -p /var/www/myapp/bin -
Create a directory that will hold the production code:
sudo mkdir /var/www/myapp/releases -
Open a new
.envfile in your editor:sudo edit /var/www/myapp/.envPaste in your app’s environment variables. We’ll have Systemd read this and feed the variables to your app later.
-
Secure this file so only the owner can read it:
sudo chmod 600 /var/www/myapp/.env -
Give ownership of this entire structure to the
myappuser:sudo chown -R myapp:myapp /var/www/myapp
Create a Deployment Script
This script handles extracting your app’s code, installing dependencies, and swapping a symlink that points to the latest release.
-
Create the script:
sudo edit /var/www/myapp/bin/deploy.sh -
Paste the following code:
#!/bin/bash # Stop execution immediately if any command fails set -e APP_DIR="/var/www/myapp" RELEASE_NAME=$(date +%Y%m%d%H%M%S) NEW_RELEASE_DIR="$APP_DIR/releases/$RELEASE_NAME" # Create new release directory mkdir -p "$NEW_RELEASE_DIR" # Extract the tar archive from standard input tar -mx -C "$NEW_RELEASE_DIR" # Install dependencies cd "$NEW_RELEASE_DIR" npm ci --cache /tmp/npm-cache # Atomic Symlink Swap ln -sfn "$NEW_RELEASE_DIR" "$APP_DIR/current" # Restart the systemd service sudo /usr/bin/systemctl restart myapp # Keep only the 5 most recent releases ls -dt $APP_DIR/releases/* | tail -n +6 | xargs -d '\n' rm -rf -- -
Make it executable:
sudo chmod +x /var/www/myapp/bin/deploy.sh -
Set ownership:
sudo chown myapp:myapp /var/www/myapp/bin/deploy.sh
You may have noticed this line in the deployment script:
tar -mx -C "$NEW_RELEASE_DIR"That line means the script expects a compressed tar archive to be passed to it. We’ll do that with a post-receive Git hook.
Configure a Bare Git Repository
This is the repository on the server to which you will push from your development machine.
-
Create a directory that will store a bare Git repository:
sudo mkdir -p /srv/git/myapp -
Change into that directory:
cd /srv/git/myapp -
Initialize a bare Git repository:
sudo git init --bare -
Create a
post-receivehook:sudo edit /srv/git/myapp/hooks/post-receive -
Paste this code, which packages the code and pipes it to the deploy script:
#!/bin/bash
set -euo pipefail

APP_USER="myapp"
DEPLOY_SCRIPT="/var/www/myapp/bin/deploy.sh"
DEFAULT_REF=$(git symbolic-ref HEAD)

while read oldrev newrev refname
do
   if [ "$refname" == "$DEFAULT_REF" ]; then
      git archive "$newrev" | sudo -u "$APP_USER" "$DEPLOY_SCRIPT"
   fi
done
Basically, when the default branch (e.g.,
main) receives a push, the hook compresses the code into a tar archive and passes it to the deployment script as the app user. -
Make the hook executable:
sudo chmod +x /srv/git/myapp/hooks/post-receive -
Give ownership to the
gituser:sudo chown -R git:git /srv/git/myapp
Configure Sudo Rules
We need to allow the new users we created to execute specific commands without being prompted for a password.
-
Use
visudoto safely create a new sudoers file:sudo visudo -f /etc/sudoers.d/deployment -
Add these two lines to the file and save:
git ALL=(myapp) NOPASSWD: /var/www/myapp/bin/deploy.sh
myapp ALL=NOPASSWD: /usr/bin/systemctl restart myapp
These two lines keep the server secure using the Principle of Least Privilege.
The first line allows the
gituser to executedeploy.shas themyappuser. You’ll have to place one of these lines for each app you deploy.The second line allows the
myappuser to restart the app. You’ll also need one of these per app.
Create a Systemd Service
This tells Debian how to keep your Node.js application running in the background. This is less powerful but simpler than managing processes through something like PM2.
-
Create a service file:
sudo edit /etc/systemd/system/myapp.service -
Paste the configuration:
[Unit]
Description=This is my web app.
After=network.target

[Service]
User=myapp
Group=myapp

WorkingDirectory=/var/www/myapp/current

ExecStart=/usr/bin/npm start

Restart=always
RestartSec=10

EnvironmentFile=/var/www/myapp/.env

PrivateTmp=true
NoNewPrivileges=true

[Install]
WantedBy=multi-user.target
This service file assumes you have a script in
package.jsoncalledstartwhich launches your app. If you don’t, just edit theExecStartline. For example, if you want to execute theindex.jsfile with Node, make the line readExecStart=/usr/bin/node index.js.Also notice the
WorkingDirectorypoints tocurrent. Remember that this is a symlink managed by the deployment script that always points to the most recent release. -
Tell systemd to read the new file:
sudo systemctl daemon-reload -
Enable it to start on boot:
sudo systemctl enable myapp.serviceThis enables start-on-boot but doesn’t start the service immediately. That’s good because it would fail right now, until we push our first deployment.
Your First Deployment!
Now, go to your development machine where your application’s source code lives.
-
Navigate to your local project directory:
cd ~/myapp -
Add the remote server (replace
YOUR_SERVER_IPwith the actual IP or hostname):git remote add origin git@YOUR_SERVER_IP:/srv/git/myapp -
Push the code to deploy!
git push origin main
If everything was set up correctly, you will see the output of the deploy.sh
script stream right back to your local terminal. When you push like this, quite
a few things happen:
- The latest code is pushed to the server.
- The post-receive hook
- packages the code into a tarball stream, and
- pipes it to the deployment script.
- The deployment script
- creates a new timestamped directory inside
releases/, - unpacks the code into it,
- installs dependencies,
- updates the
currentsymlink to point to the new release, - restarts the
myappsystemd service, and - deletes old releases
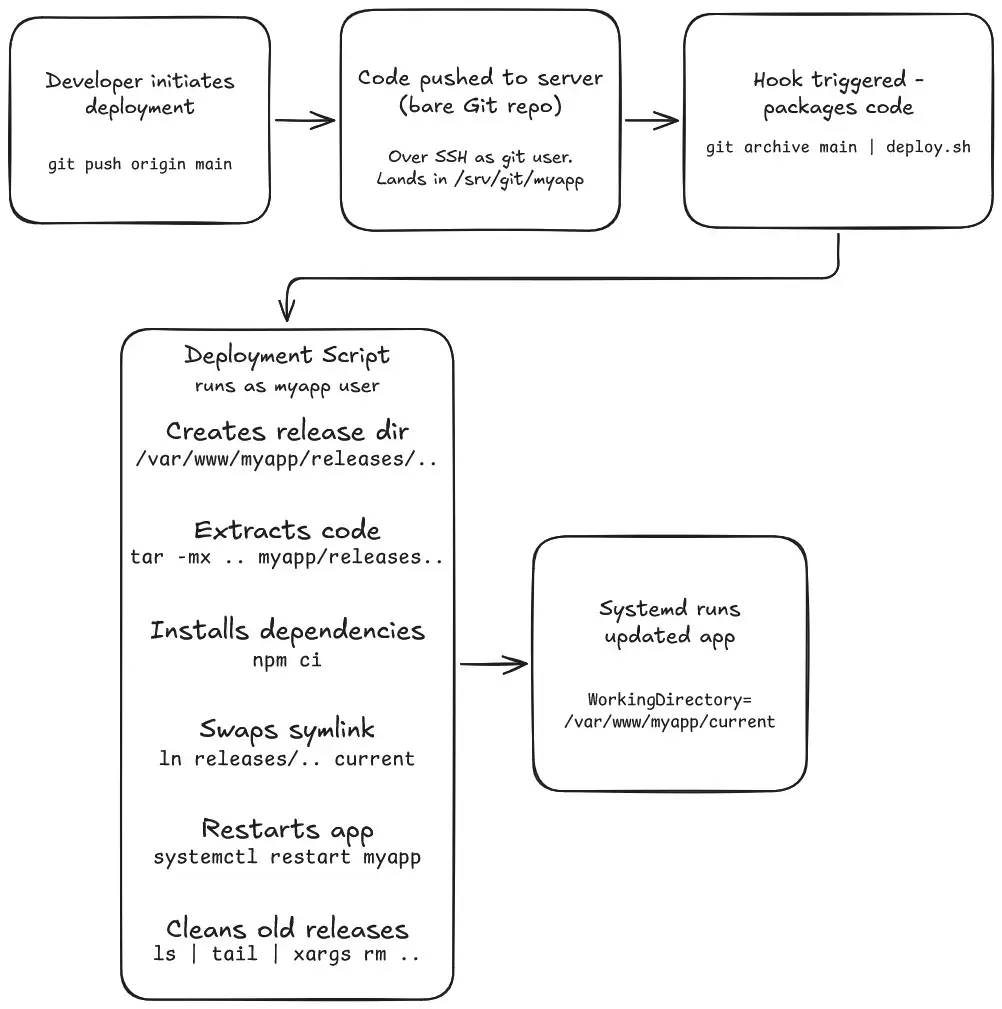
Your app is now live!
Congratulations, you just built a deployment pipeline without relying on
third-party services. You now have a custom deployment process that is secure,
automated, and fast. Go ahead, make a quick code change, type git push, and
watch your server do the heavy lifting.
Cover photo by Bhautik Patel on Unsplash.